Advanced Tools
The following tools are under the Compute->Advanced menu. Most users should not need these tools, but they may come in handy on challenging data sets where the normal compute steps do not work ideally.
Filter Tracks
This tool filters the set of tracks to find a reduced set of tracks that spans the same frame range. It tries to keep the longest, most stable tracks and throws out many short tracks. The goal is to make bundle adjustment more efficient by limiting the solution to the most important tracks. Since we now limit how many features are tracked to begin with, this tool does not usually provide a benefit.
Triangulate Landmarks
Triangulate Landmarks attempts to create a 3D landmark position for each feature track by back-projecting a ray through the feature point locations in each image and intersecting these rays in 3D space. The triangulation is fast and should finish almost instantly, however it requires accurate camera models to work. The Triangulate Landmarks tool requires both feature tracks and cameras to work.
If the metadata for camera poses is very accurate one can bypass the Estimate Cameras/Landmarks step and directly triangulate landmarks. The triangulated positions will likely still be very noisy, but this can be improved by bundle adjustment using the Refine Solution tool below.
Refine Solution
Refining the solution optimizes the calibration and pose of the cameras as well as the locations of the 3D landmarks in a process known as bundle adjustment. This tool requires tracks, landmarks, and cameras to run. It adjusts the parameters such that the bundle of rays used to triangulate each point meets more precisely at a single location. Bundle adjustment is already run as part of Estimate Cameras/Landmarks, but this option allows it to be run directly. Direct refinement is useful for features that are directly triangulated from metadata cameras.
Running this algorithm can take some time. While it is running, the solution incrementally improves, and updated results are displayed as the solution evolves. Bundle adjustment tends to make very large corrections very quickly and then spend lots of time fine tuning the final solution to get it just right. The cancel option allows the user to exit the optimization early and keep the current state of progress. Cancelling is useful when the solution is taking too long to complete but appears to have found a reasonable solution. It helps get a solution more quickly but beware that a suboptimal solution will impact the quality of later 3D reconstruction stages. It is better to wait for completion when time is available.
Reverse (Necker)
There is a special type of failure mode in camera calibration that only happens with very long focal length cameras. This failure mode happens because of a depth reversal ambiguity that occurs when perspective distortion is lost and the projection is nearly orthographic. The solution is bistable, just like to famous Necker Cube optical illusion. Under this “Necker Reversal” the one can invert the height of landmarks and flip cameras upside down and mirror them across the orbit to produce nearly identical geometric projection. The Reverse (Necker) tool flips the data into this alternate configuration to rectify this invalid solution. Note that Necker Reversal is not a problem when geospatial metadata is available or when one can make assumptions about the orientation of the cameras (e.g. up in the world is up in the image). The Initialize Cameras/Landmark tries to automatically detect and correct for this ambiguity, so this the manual correction is rarely needed.
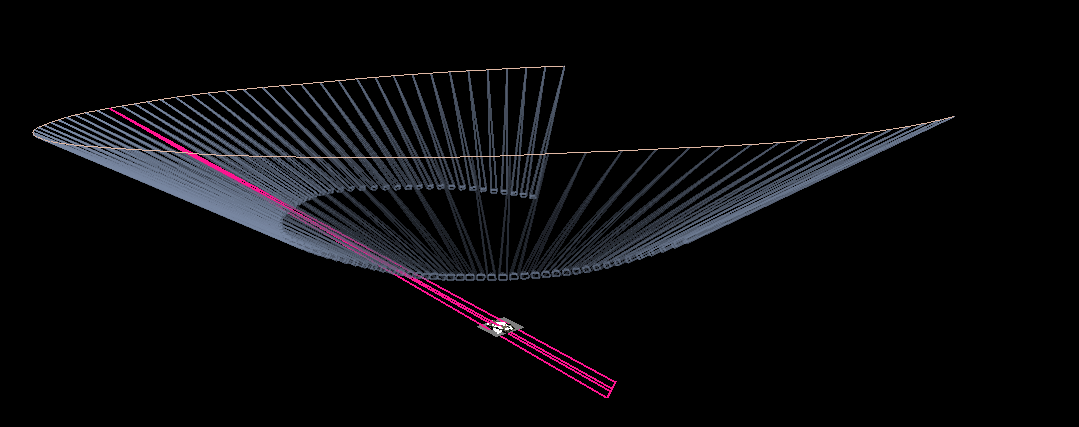
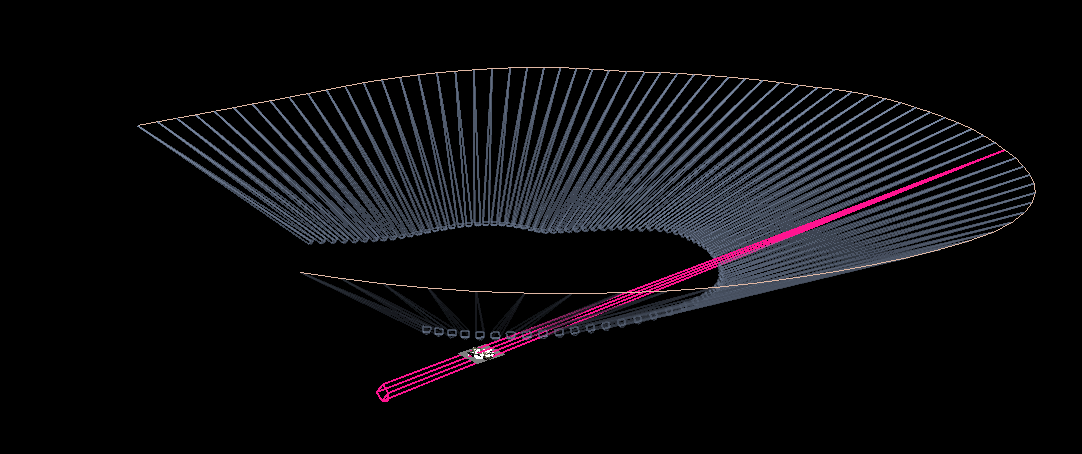
Effect of Necker Reversal on camera orbits. Bottom cameras are flipped and upside down.
Align
The Align tool is for videos that do not have metadata. Without metadata the orientation, position, and scale (7 degrees of freedom) of the solution are completely undetermined. The solution floats freely in space. The Align tool attempts to align the data to a canonical coordinate system with the following properties: The centroid of the landmarks is aligned to the origin. The direction of minimal landmark variance is aligned with the Z axis with cameras on the positive Z side. The scale is set such that the variance is landmark positions from the origin is one. The origin is shifted along Z such that 90% of landmarks are above Z=0 (ground plane estimation). This algorithm is also now run automatically as part of Initialize Cameras/Landmarks, so this manual tool is rarely needed.
Save Key Frames
The Save Key Frames tool is the same as the Save Frames tool except that it only saves frames that are marked as key frames by the Track Features tool. Saving only key frames makes more sense than saving all frames for use in SketchUp. However, the selection of key frames is not currently reliable. Sometimes only one keyframe is selected. One could try this option first and then save all frames if not enough keyframes are available. To preview the key frames select Keyframes Only from the View menu and play back the video.
Compute Single Depth Map
The Compute Single Depth Map tool is the same as the Batch Compute Depth Map tool except that it only computes on depth map on the current frame. The tool provides live visualization of the intermediate results to visualize how the solution evolves over compute iterations. The initial estimated point cloud will be quite noisy and then will continue to improve with live updates shown in both views as the algorithm progresses. Much like the refine solution tool, the solution improves quickly at first and then spends a longer time fine tuning the solution. The cancel option will also end the optimization early for this tool.